Shinobi
There are three different ways to run a plugin, and they are not interchangeable — pick the one that matches your setup. All three can be driven from the Plugin Manager; Docker and bare metal can also be done fully by hand from the terminal.
worker_thread spawned by Shinobi itself. Doesn't connect via websocket, since it's part of the Shinobi process. Doesn't need Docker. Needs GPU drivers on the host only for GPU acceleration.
pluginKeys pairing). Doesn't need Docker. Needs GPU drivers on the host only for GPU acceleration.
pluginKeys pairing). Needs Docker. Needs GPU drivers on the host for GPU images.
Instead of running as a separate process or container, Shinobi can load a plugin and run it itself as an in-process worker_thread (child process) — no Docker, no standalone process, and no websocket/pluginKeys pairing needed, since it isn't a separate connection at all.
http://YOUR_SHINOBI/super) and open the Plugin Manager tab.
npm install) directly on the host — some plugins will interactively ask you to pick an acceleration mode (CPU/CUDA/ROCm/OpenVINO) and can optionally install the matching GPU driver for you at this step (see GPU Drivers below; a reboot may be required if a GPU driver is installed).
enabled flag for that plugin in conf.json.
main script as a worker thread inside its own process. Its status is shown as Enabled (Worker) / Disabled (Worker), independently of any Docker or websocket connection status the same plugin might also have.
Not every plugin supports running as a worker; check the individual plugin's README under plugins/<plugin>/README.md.
Access to the Plugin Manager is controlled per-account via the "Can use Plugin Manager" permission in user details.
The plugin is installed directly on the host's OS (no container) and runs as its own standalone process, connecting back to Shinobi over a websocket. Use this if you don't want Docker installed at all, or need the plugin on bare metal for performance/hardware-passthrough reasons, but don't want (or the plugin doesn't support) running as a Worker.
http://YOUR_SHINOBI/super) and open the Plugin Manager tab.
client mode as its own standalone process, and pair it with Shinobi — see Pairing your Plugin to Shinobi below.
You can also do this entirely from the terminal without the Plugin Manager: cd into the plugin's folder under plugins/ and run npm install (or the plugin's documented install command) yourself, then pair it manually.
The plugin runs as its own Docker container, isolated from your host install of Shinobi, and connects back to Shinobi over a websocket. See Requirements: Docker below before starting — Docker (and GPU drivers, if applicable) must already be installed on the host.
Via the Plugin Manager (Recommended)
http://YOUR_SHINOBI/super) and open the Plugin Manager tab.
docker/ folder (most plugins do). This pulls the plugin's image from the container registry and runs it as a container connected back to your Shinobi instance automatically — no manual docker-compose or pairing key editing required.
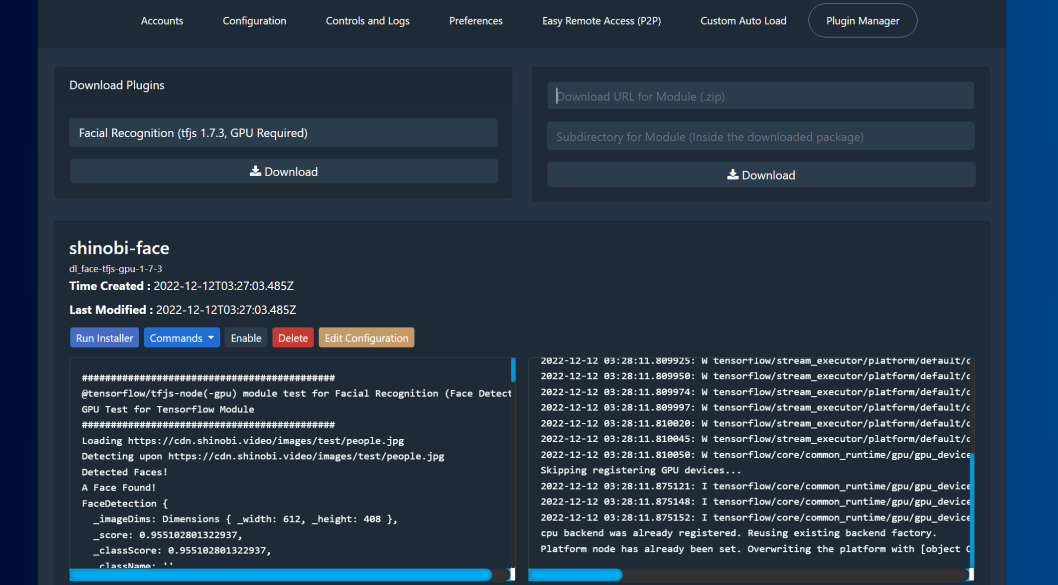
When deploying via Docker, the Plugin Manager auto-generates and stores the pairing key in pluginKeys in your conf.json, and auto-detects your host's LAN IP so the container can connect back to Shinobi. You can override the host if needed.
Manually, via Terminal
This is just a wrapper for docker-compose. It utilizes the default docker-compose.yml and generates a new one based on the plugin you selected. Use this if you're not running a Shinobi version with the Plugin Manager, or prefer the terminal. Below is the command to run. If you select nothing it will use tensorflow-4-1-0.
sh install_with_docker.sh $PLUGIN_DIR $PLUGIN_KEY $PLUGIN_NAME $USE_NVIDIAHere is an example of selecting and daemonizing YoloV5 PyTorch.
sh install_with_docker.sh yolo-v5-pt ffff12345 BigYoloPlug trueHere's a breakdown of what each argument of the command is and does.
PLUGIN_DIR is the folder name seen in the plugins folder. In our example we used yolo-v5-pt.
PLUGIN_KEY is the pairing key for your plugin and Shinobi instance. It can be set to anything you want, they just need to match on both ends. This is explained below.
PLUGIN_NAME is the human name for your plugin. It is also used for the quick pairing setup.
USE_NVIDIA is for toggling use of an NVIDIA GPU for the plugin's base image. Default is false.
Since this method doesn't run through the Plugin Manager, you'll need to pair it with Shinobi manually — see Pairing your Plugin to Shinobi below.
Any plugin deployed as a container — whether through the Plugin Manager's Pull & Run (Docker) button or the manual install_with_docker.sh script above — requires Docker to already be installed on the host running Shinobi.
Installing Docker
curl -fsSL https://get.docker.com | sh. Afterwards, add your user to the docker group so you don't need sudo for every command: sudo usermod -aG docker $USER (log out/in or reboot to apply).
docker --version. The Plugin Manager will also show a warning/won't offer the Docker option if it can't detect Docker on the host.
GPU Drivers (only needed for GPU-accelerated images)
Plugins may offer several image variants (see each plugin's docker/ folder, e.g. Dockerfile.cpu, Dockerfile.cuda, Dockerfile.rocm, Dockerfile.openvino). The GPU variants (cuda, rocm) run inference on your GPU, but Docker does not provide GPU access on its own — the correct host driver and container toolkit must be installed first, or the container will fail or silently fall back to CPU. This applies equally to the Worker and Bare Metal methods above — GPU acceleration always needs the matching host driver installed, Docker or not.
sudo ubuntu-drivers autoinstall, or download from nvidia.com/drivers). Verify with nvidia-smi. Then install the NVIDIA Container Toolkit so Docker can access the GPU, and verify with docker run --rm --gpus all nvidia/cuda:12.4.1-base-ubuntu22.04 nvidia-smi.
--device=/dev/kfd --device=/dev/dri) — the Plugin Manager's rocm variant handles this automatically when deploying via Docker. Verify the host driver with rocm-smi.
curl -fsSL https://nvidia.github.io/libnvidia-container/gpgkey | sudo gpg --dearmor -o /usr/share/keyrings/nvidia-container-toolkit-keyring.gpg
curl -s -L https://nvidia.github.io/libnvidia-container/stable/deb/nvidia-container-toolkit.list | sed 's#deb https://#deb [signed-by=/usr/share/keyrings/nvidia-container-toolkit-keyring.gpg] https://#g' | sudo tee /etc/apt/sources.list.d/nvidia-container-toolkit.list
sudo apt-get update && sudo apt-get install -y nvidia-container-toolkit
sudo nvidia-ctk runtime configure --runtime=docker
sudo systemctl restart docker
If you only plan to run the cpu variant, none of the above GPU driver steps are needed.
All three install methods above are expected to handle pairing for you automatically (the Plugin Manager sets up pluginKeys itself for Docker/Bare Metal, and the Worker method doesn't need pairing at all since it isn't a separate connection). The steps below are provided in case you need to pair a plugin manually — e.g. a fully manual/terminal install, a plugin on a separate machine, or troubleshooting a pairing that didn't take.
http://YOUR_SHINOBI/super. YOUR_SHINOBI is your Shinobi's IP and Port.
pluginKeys object. If it does not exist you can add it. Set one of the keys as the parameter and value shown below.
conf.json as regular JSON in the top bar of this tab. Quickly paste and save.
"pluginKeys": {
    "$PLUGIN_NAME": "$PLUGIN_KEY",
    "$PLUGIN_NAME2": "$PLUGIN_KEY2"
}$HOME/Shinobi for Docker installations of Shinobi. /home/Shinobi is default for bare metal installations.
conf.json : nano conf.json
pluginKeys object with the following addition. If pluginKeys does not exist you can create it.
cd $HOME/Shinobi
nano conf.json
"pluginKeys": {
"$PLUGIN_NAME": "$PLUGIN_KEY",
"$PLUGIN_NAME2": "$PLUGIN_KEY2"
}